
- Invoicing 1: Prerequisites (fees, document templates, invoicing by business unit)
- Invoicing 2: Time entries, charges, recurring fees, stub payments, prepayment
- Invoicing 3: Review time records
- Invoicing 4: Transfer WIP to billing, prepare and post invoices
- Invoicing 5: Review and pay invoices
To add a time entry
- Click Client administration > Lists > Clients.
- Click Find all.
- Locate and double-click the client you'd like to work with.
- Click Fees > Work in progress.
- Click Actions > Add time entry.
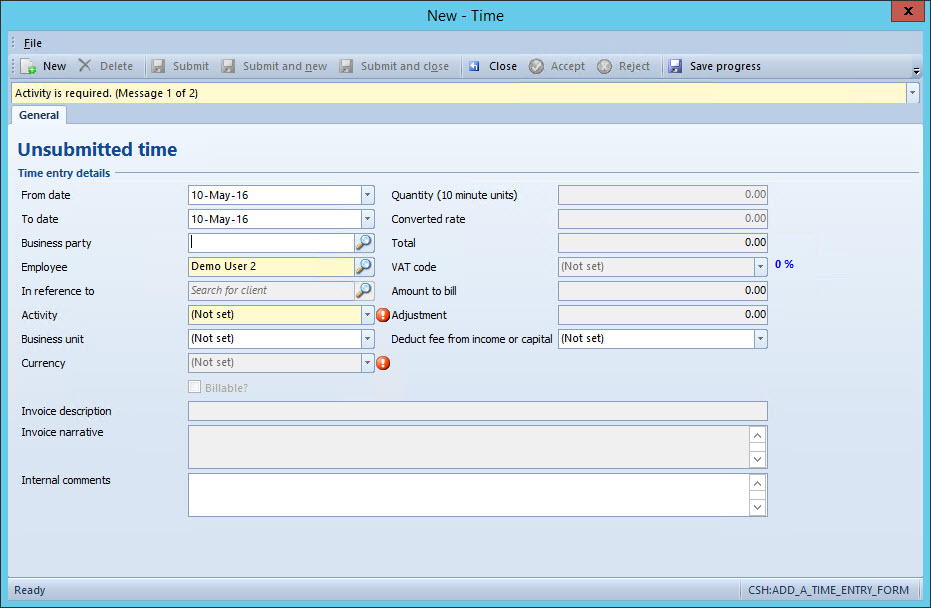
 Employee field will be greyed out and prepopulated with your name unless the workflow right Can create time/charge entries on behalf of others is checked for your current employee role. If it is checked, then you will be able to select another employee to submit the time entry on behalf of. Business party field will be prepopulated since you are in the clients properties.
 - In Activity, select the hourly fee you created.
- In Business unit, select the business unit. This field will be prepopulated if Always post to this business unit? was selected when creating the fee.
- In Quantity (Hours), enter the amount. The Minimum quantity, Maximum quantity, and Standard quantity are set when creating the fee. See Create a fee for more information. The following fields will all be prepopulated based on the Quantity (Hours) selected and the fee calculation and invoice description/narrative created on the applicable fee: Currency, Invoice description, Invoice narrative, Hourly rate, Total, and Amount to bill.
- To use an employee's Charge out rate as the default rate, see how to set the employee's charge out rate as the default for further information.
- Click Submit and close.
 See Time entry (form) for further details on the fields.
To accept a time entry
- Click Client administration > Lists > Clients.
- Click Find all.
- Locate and double-click the client you'd like to work with.
- Click Fees > Work in progress.
- Locate and right-click the entry and select Accept.
 For more information regarding enabling employee roles and setting up approval processes, see how to enable approvals for time entries.
To add a charge
- Click Client administration > Lists > Clients.
- Click Find all.
- Locate and double-click the client you'd like to work with.
- Click Fees > Work in progress.
- Click Actions > Add charge.
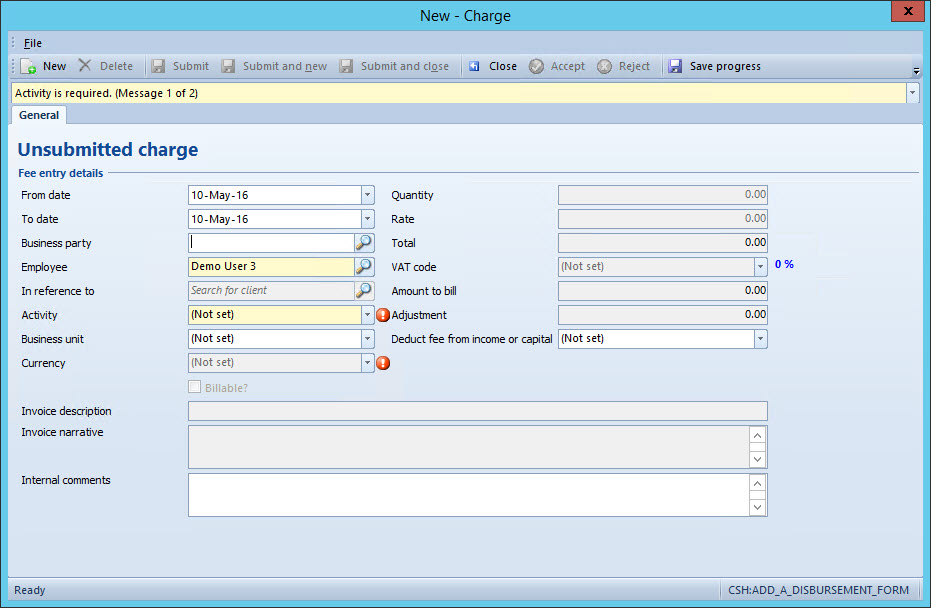
- Employee field will be greyed out and prepopulated with your name unless the workflow right Can create time/charge entries on behalf of others is checked for your current employee role. If it is checked, then you will be able to select another employee to submit the time entry on behalf of.
- Business party field will be prepopulated since you are in the clients properties.
- In Activity, select the expense fee you created.
- In Business unit, select the business unit. This field will be prepopulated if Always post to this business unit? was selected when creating the fee.
- Amount to bill field will be prepopulated if a fee calculation has been created for the selected fee. If a fee calculation does not exist, a field called Amount to charge will appear which will allow you to enter a custom amount.
- The following fields will all be prepopulated based on the Quantity (Hours) selected and the fee calculation and invoice description/narrative created on the applicable fee: Currency, Invoice description, Invoice narrative, Hourly rate, Total, Amount to bill To use an employee's Charge out rate as the default rate, see how to set the employee's charge out rate as the default for further information.
- Click Submit and close. See Charge (form) for further details on the fields.
To accept a charge
- Navigate to client's properties > Fees > Work in progress.
- Right-click the charge.
- Click Accept or Reject.
Recurring fees
Now that you have added fees and invoice templates to Primacy, you can set up a recurring fee.
- Click Client administration > Lists > Clients.
- Click Find all.
- Locate and double-click the client you'd like to work with.
- Click Fees > Recurring fees.
- Click Add recurring fee. You may also click Actions > Add recurring fee.

- In Starts on, select the date you would like the fee to commence. You can set the Starts on date to January 1st of the applicable year if you would like all of your recurring fees to be charged at the beginning of the year. You can then charge the client a stub payment to collect the remaining fees up until that date. For example, it is October 1, 2016, and you have a new client in which you would like to charge fees. You can set the Starts on date for the recurring fee to January 1, 2017, and charge the client a stub payment for fees between October 1, 2016, and December 31, 2016. See Stub payment for more details.
- In Fee, select the fee we created earlier.
- In Invoice frequency, select how often you would like the recurring fee to be billed.
- In Rate basis, select Use current fee amount. If you select Use current fee amount, the Annual charge value will reflect the fee calculation that you previously set up on the fee. If you would like to use another amount select the value Custom.
- In Reason for custom rate, enter a reason. This field will only be enabled if Custom is selected as the Rate basis.
- In Currency, select the currency you would like to use for the fee.The Annual charge will automatically populate with the fee amount. If you have selected Use current amount as your Rate basis, the Annual charge field will only be pre-populated with the fee amount if the currency you selected has a fee calculation created.
- When all fields have been entered, click Submit. The Accept and Reject buttons will be enabled. Once submitted, you can click the Invoicing tab and verify the invoice narrative and description details.
- Click Accept.
- A confirmation screen will appear. Click Yes.
- Click Close. See Recurring fee (form) for further details on the fields.
The fee will now appear in the Recurring fees list (in the client Properties) as Approved. It will also appear in the standalone Recurring fees list (Time and billing > Lists > Recurring fees).
Stub payment
In the example below we have decided to set the Starts on date for the recurring fee to January 1, 2017, and charge the client a stub payment for the period of January 14, 2016 (today's date) to December 31, 2016. As you can see the invoice date is set to today's date and the amount has been automatically calculated. The Amount calculation being used in the screenshot below is By days, meaning that the Annual charge amount is divided by the number of days in a year and then charged for the period January 14, 2016 (today's date) to December 31, 2016. You also have the option to calculate By months.
If you would like the value to be automatically calculated, you can navigate to System properties (Settings > Lists > Application configuration > System properties) and search for Stub payment calculation method. The options for Value are By months or By days.
If you would like to set a custom amount, click the Override first payment calculation? checkbox and enter a new amount in the Amount field.

Prepayment
In Primacy, there is an option to allow a client to pay for fees in advance.
Once you click the Pre-pay fees? checkbox you must then indicate the number of periods you would like to pay in advance. The Amount is automatically calculated based on the Annual charge and the number of Periods.

See Recurring fee (form) for further details on all fields.
Comments
0 comments
Please sign in to leave a comment.