
This is the process from time entry / charge to invoice and bill payment. The Transfer WIP to billing process transfers any recurring fees that fall within the date parameter. Invoice items, whether they are time records, recurring fees or charges all go through the same stages before they are invoiced and so the cycle explained below can be applied to all three types of invoice item.
To add a time entry
- Click Time and billing > Lists > My time sheet calendar.
- Under Recently used clients, drag and drop the client into the calendar.
- Under Details, click the Add time entry button.
- Enter fields where appropriate. See Time entry (form) for more details.

 To use an employee's Charge out rate as the default rate, see how to set the employee's charge out rate as the default for further information.
- Click Submit and close.
To approve the time record
- Click Time and billing > Lists > Process timesheets.
- Under Time entries, locate and right-click the entry and select Accept.
 For more information regarding enabling employee roles and setting up approval processes, see how to enable approvals for time entries.
To transfer WIP to billing
The Transfer WIP to billing command can be given from the Actions button in three different screens. There are a number of system properties which influence this:
- Allow transfer WIP to billing from Billing items
- Allow transfer WIP to billing from Prepare client invoices
- Allow transfer WIP to billing from Review work in progress
Time entries as well as recurring fees and charges can be transferred in one process. There are a number of filters available in the transfer form. See How to transfer WIP to billing for more information.
To prepare client invoices
- Click Time and billing > Lists > Prepare client invoices.
- Locate and right-click the item. Select Ready to bill.
- Right-click the item and select Post invoices...
To select multiple items anywhere in the process, filter the list first and then select the check box in the first column of the header row. Selecting this check box will place a tick against all items in the filtered rows. To filter a list enter the value in the filter field below the header row.
To print an invoice
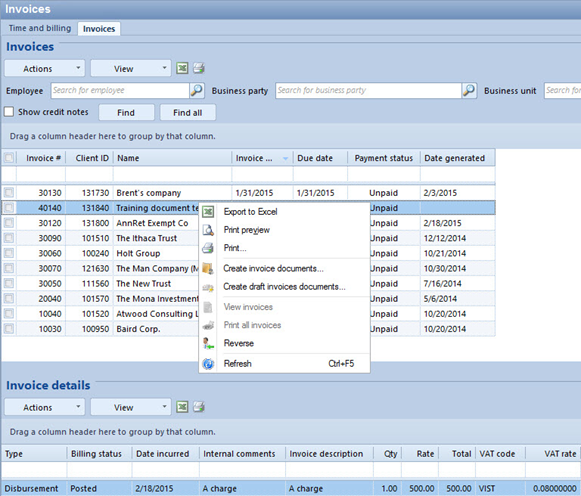
- Click Time and billing > Lists > Invoices.
- Click Find all or use search fields to refine your search criteria.
- Right-click an invoice.
- Click Create invoice documents... See View draft invoices (form) for more details.
- Click Find all invoices to generate or use search fields to refine your search criteria.
- Click the check box pertaining to the invoices to generate.
- Click Create invoices.
- Click View invoices... under the column Generating status.

To pay an invoice
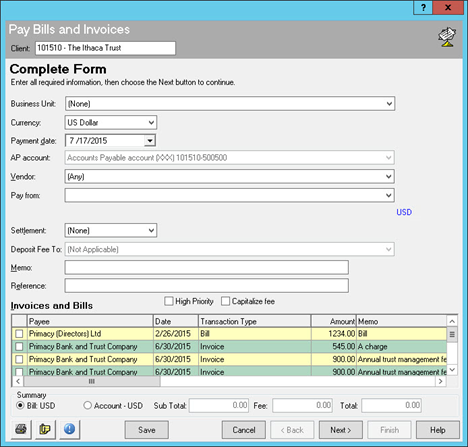
- Navigate to the Make bill payment form using Quick launch.
- Select a client.
- Enter values in the fields where appropriate.
- Select each checkbox of the invoice you would like to pay under Invoices and Bills.
- Click Next >.
- Click Finish.
To review outstanding fees
- To review account payable, click Financial management > Lists > Accounts payable.
- To review accounts receivable, click Financial management > Lists > Accounts receivable.
- To view details of an outstanding invoice, click Financial management > Lists > Invoices. Use the Make bill payment form to settle an invoice.
Comments
0 comments
Please sign in to leave a comment.